


Click this messge to hide it.
We want you to enjoy your purchase to the full so we produced this comprehensive guide to the product category you purchased. It contains useful information, advice and tips. Please take a few minutes to read it and either print it or save it on your computer for future reference. You should also have received our Important Delivery Information with detailed advice about all aspects of your delivery including vehicle access, unloading and storage. Please contact us if you have not received it.
CONTENTS
Scroll down or click on the links below:
- GALVANIZED STEEL CLADDING
- SITING & BASE
- RELOCATABLE BASE KITS
- GALVANIZED STEEL BASES
- ANCHORING YOUR BUILDING
- PLANNING & BUILDING REGULATIONS
- ASSEMBLY
- SPECIFIC ASSEMBLY TIPS
- PARTS & SPARES
- CONDENSATION
- PROTECTION FROM WIND & RAIN
- INTERNAL STORAGE
- INSURANCE
- COMMERCIAL USE
- UKCA MARKING
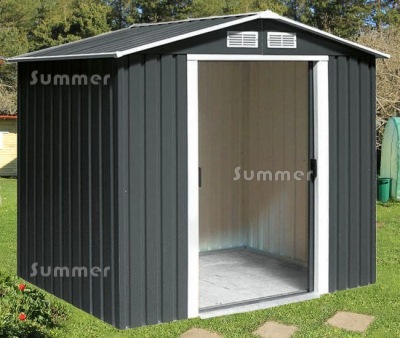
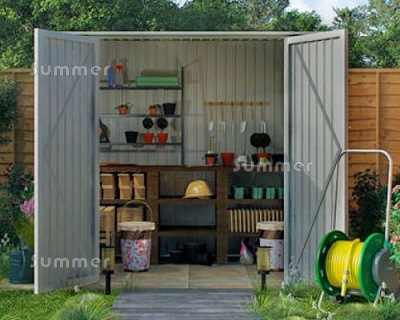
PICTURE: An apex roof metal shed with double sliding doors
Sensational prices and fast delivery - these popular metal buildings have been among our best selling garden buildings for many years with thousands of sales every year. They are a popular choice partly because they provide strength and durability with little maintenance at a fraction of the cost of a wooden building of a similar size. Installing a metal building is a straightforward task but it may take a little longer due to the number of fixings. No staining or painting is ever needed. Metal buildings can be cleaned occasionally with warm soapy water using a soft and non abrasive sponge or cloth. Avoid abrasive cleaning fluids such as cream cleaners which may damage the surfaces.
GALVANISED STEEL CLADDING
- Steel is the strongest material used in construction. Galvanised steel is treated to inhibit rust, making it more durable.
- Most sports grounds, retail superstores, factories and warehouses are clad with steel sheets less than 1mm thick.
- Steel cladding sheets are corrugated to provide extra strength.
- The strength of buildings with steel cladding is provided by the framing and not the cladding.
- Substantial galvanised framing ensures that our metal buildings are rigid. As with the corrugated cladding sheets, the framing is profiled for maximum strength.
- Minor damage to the corners of cladding sheets is not uncommon. It is easy to straighten the corners of each sheet individually with your fingers.
- The cladding sheets are powder coated, which is a similar finish to a washing machine or a fridge.
- The steel cladding is galvanised before it is powder coated so minor surface scratches do not deteriorate.
- Many of the powder coated steel components are covered with a thin plastic film. This protective film is easily scratched and it often looks like the paint surface is scratched when it is not. Instead it shows that the protective film has done its job.
- We do not recommend removing the protective film. It takes hours and there is no benefit. If you do nothing the film will gradually disappear over time when exposed to the elements.

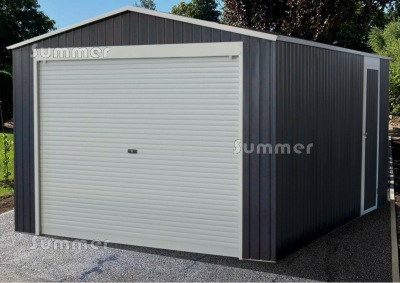
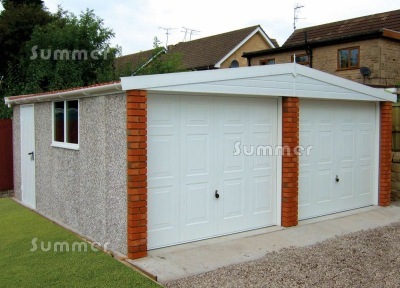
PICTURE: A metal garage with double hinged doors and a single personnel door
SITING
Ideally your building should have a clear space at least 18" wide on all sides, if possible. This ensures easy access for both installation and future maintenance. In reality this is not always practical. At many sites a reduced clearance is often possible on one or two sides with care. If the space around your building is restricted remember to allow for any roof overhang. You should also cut back or remove any nearby shrubs and trees. Remember to allow for future growth. We recommend a sheltered position which is not exposed to strong winds. If possible site your building close to existing features such as other buildings, walls and fences. Your building should not be elevated above the surrounding ground. Even a slight elevation of only a few inches presents a higher profile with increased wind resistance. More caution is needed at an exposed location, for example in a rural or coastal area or anywhere which is exposed to strong winds.

PICTURE: Base preparation often starts with the removal of existing turf.
MINIMUM REQUIREMENTS FOR THE BASE
- All buildings need a substantial base, which should be solid, flat and level to ensure the stability of your building.
- The base should be slightly higher than the surrounding ground to protect against flooding but no more than a few inches higher or the building will be more vulnerable to winds.
- The base should be no smaller than the external size of the new building and no more than a few inches larger.
- Rainwater may seep inside under the foundation rails if the base is more than a few inches larger than the building, especially on the most exposed sides.
- The foundation rails of your building must be securely fixed down into the base.
CONCRETE BASE
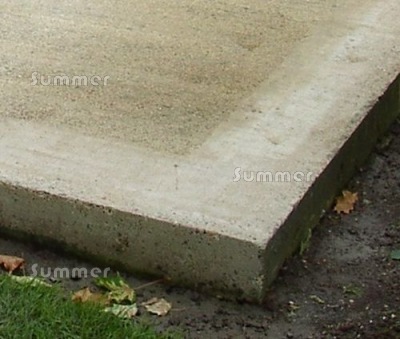
PICTURE: A concrete base.
- A solid concrete base is more permanent and normally more expensive but it provides an excellent base, especially for a larger building.
- We recommend a solid concrete base for a garage if you intend to park cars inside regularly or if you just want the option to park cars at some time in the future.
- We recommend 100mm thick concrete with a thickened toe beam tapering to 300mm thick at the edges.
- An interval of up to seven days is advisable between the base and installation. However, if required in warmer weather it may be possible for installation to proceed with care after a shorter interval. Shuttering should not be removed for at least seven days.
- The edges of the concrete base should be trowelled smooth to a width of around 6" or 150mm wide on all sides. The edges should be slightly chamferred by a few millimetres to discharge rainwater. The edges should be flat enough to support the wallls but sloping enough to drain water away.
- For a garage a substantial concrete ramp is normally required at the front if access for cars is required. Normally, at a reasonably flat site the ramp slopes upwards. However, at a sloping site the ramp may slope downwards if the drive is higher than the base and if so a drainage trench or a french drain may be required to prevent water ingress. A metal weatherbar can also be fitted inside the doorway with a protruding lip to reduce water ingress.
PAVING SLAB BASE
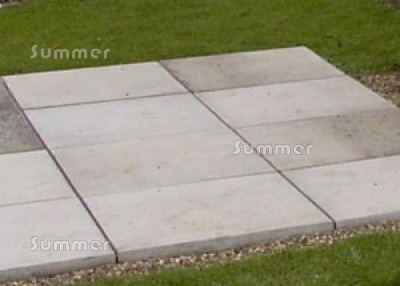
PICTURE: A paving slab base.
- Paving slabs are also easier to handle than concrete and easier to remove if the garden is redesigned.
- Paving slabs are more practical and cost effective than concrete, especially for a smaller base at the far end of the garden.
- The slabs should be laid on sand, mortar or concrete.
- The slabs can be carefully cut with a grinder on two sides after the building has been completed, to reduce the amount of water which seeps in under the walls.
- A paving slab base may be suitable for a garage if car parking is not required, for example if the garage will be used as a workshop or for storage use.
USING EXISTING PAVING OR CONCRETE AS A BASE
Siting a building directly onto existing paving or concrete avoids any costly base construction and saves a lot of time and money. However, existing patios are normally laid to a fall. An existing patio rarely makes a level base and the building may not be fully square, which may cause issues. For example, doors may require more frequent adjustment. The larger the building the more this is amplified. In addition, if the existing patio is much larger than the building it may cause dampness inside as rainwater may seep in under the walls. Despite this the building can be a useful storage area for bicycles, lawnmowers, garden tools and many other garden and household items. It is not normally possible to permanently seal around the base of walls. However, any dampness inside is significantly reduced by laying a floor inside, which raises the floor level inside above the surrounding ground. An internal floor can be laid retrospectively if required. It can be a simple timber floor with decking tiles, a traditional timber floor with boards laid over joists or a mortar screed. A mortar screed is normally up to 2" thick (40-50mm) and made with a strong semi-dry sand and cement mixture which is floated smooth with a trowel. Our galvanised steel base kits are helpful with any internal floor, either as a prefabricated joist kit for a boarded floor as a useful levelling guide for an inexperienced person laying a mortar screed.
Another way to reduce water ingress from an oversize existing patio is to cut out a drainage trench around the sides as needed. This can be added retrospectively after the building has been installed. Use a grinder to cut neat edges through existing concrete or paving. The trench should be at least 8-12" wide (200-300mm) and filled with soft material such as soil or gravel, to a depth at least 4-6" (100-150mm) below the floor level of you building.
Another simple and effective way to mitigate the effects of water ingress from an oversize patio is to lay one of our relocatable bases over the patio before installing the shed. This only takes a few minutes and it raises the floor level above the surrounding ground.
RELOCATABLE BASE KITS
Our unique plastic and pressure treated timber base kits can be laid directly onto concrete, paving or decking or onto compacted hardcore if the finished surface is flat, hard and level. Lightweight and fully relocatable, our durable base tiles are easy to install within a few minutes, with no fixings needed. If required, a waterproof floor covering such as linoleum can be laid over the tiles to reduce dampness inside the building. This can be laid retrospectively.
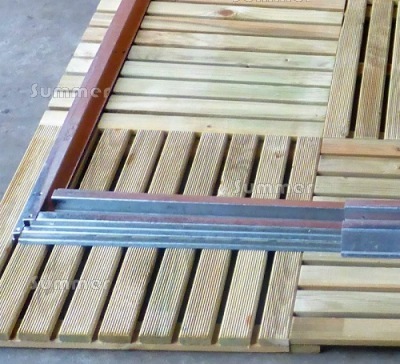
PICTURE: A pressure treated timber base, showing the foundation rails
PRESSURE TREATED TIMBER BASE KITS
All timber is pressure treated which ensures a longer lifespan. Pressure treatment is a lifetime preservative treatment. Each tile is 500mm x 500mm in area with a reeded finish. A small gap between each board allows for expansion and contraction of the timber in varying climatic conditions. If required, substantial timber bearers can be used below the tiles allow ventilation under the floor which reduces dampness inside the building. If required, timber bearers should be at least 2"x2", pressure treated and spaced around 10" or 250mm apart.
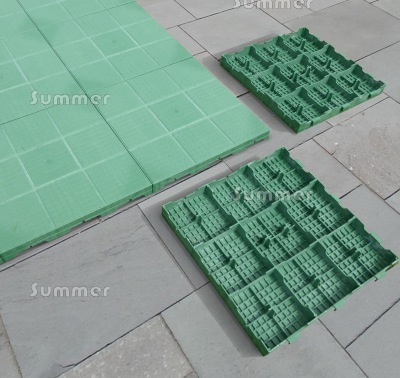
PICTURE: A plastic base, showing the underside of two pavers
PLASTIC BASE KITS
Our plastic bases last almost indefinitely, even in damp conditions. The interlocking plastic floor pavers simply click together with no fixings needed. Each paver is impermeable with 12 separate locking points per paver to ensure maximum rigidity. Our durable plastic base kits will prolong the life of your shed and the contents. The finished base is self draining and capable of supporting considerable weight because the tiles are designed to spread weight. If your plastic base is laid over existing concrete, paving or bricks we offer hammer fixing kits to fix through the base into the concrete. If your plastic base is laid on compacted hardcore we offer screw fixing kits with self tapping screws.
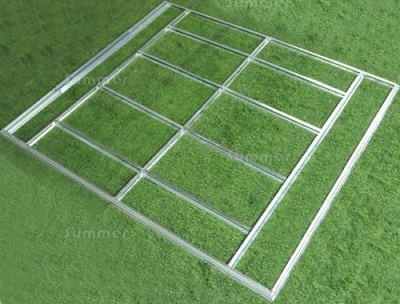
PICTURE: A galvanised steel base, fitted to the foundation rails of a metal shed.
GALVANIZED STEEL BASES
Our galvanized steel base kits make building a separate floor easier. The steel beams can be used to make laying a mortar floor screed easier or to support a timber floor. The steel beams can be laid directly onto any flat and level surface including paving, concrete or decking. The steel frame is easy to assemble and the correct size to suit the shed. The steel frame can be used to support a timber floor with tongued and grooved boards, OSB or plywood.
The steel frame also makes laying the mortar screed easier, especially if you are inexperienced with mortar. The layout of the steel beams divides the floor into small sections. Each section is filled with mortar and levelled with a trowel or a piece of wood stretched across the surrounding steel beams. The foundation rails include an internal lip which is buried under the mortar screed to ensure that the shed is anchored down by the screed. Everything you need is included except the mortar, which is not expensive and widely available from DIY stores. The easiest way to make a screed is using pre-mixed mortar. You just add water and stir before use. Alternatively, it may be cheaper to buy the sand and cement separately and mix the mortar with 1 part cement to 4 parts sand. A 50mm thick screed requires around 100kg of mortar per square metre, based on the internal area of your building.
PICTURE: A pent roof shed with double hinged doors
ANCHORING YOUR BUILDING
Your building must be securely anchored down into the base. The foundation rails and door thresholds at the bottom of each wall should be firmly fixed down from inside to ensure that they cannot move. This is especially important for any building without an integral floor, to ensure that the walls are held securely in place and to maintain structural integrity.
We offer a variety of fixing options including base fixing kits with sufficient screws to fix the foundation rails of your building into either a plastic base or a pressure treated timber base.
We also offer hammer fixings which are recommended if your building is sited on a solid base of concrete or paving to ensure that it is securely fixed down. The pack includes sufficient hammer fixings to fix the pre-drilled foundation rails into the base. The fixings are drive-in hammer screws with a nylon sleeve. A masonry drill bit is also available as an option if required. Drive in hammer fixings are simple to use. First the hole is drilled in the masonry and then the fixing is hammered home. If required the screw head allows easy removal with a screwdriver. As an alternative, screws and nylon plugs can also be used.
Corner brackets are also recommended if your building will be subject to frequent use or if it is sited in an exposed area. The corner brackets strengthen the corners and also make it easier to fix your building down into a solid base. The kit includes 4 galvanized steel corner brackets. Screws are included to fix the brackets into the foundation rails. Screws and nylon plugs are also supplied for fixing into bricks, concrete or paving slabs.
PICTURE: A metal garage with a rollover door and a single personnel door
PLANNING
The majority of garden buildings do not require planning permission at a private dwelling if the size and position is within certain guidelines. However:
- Permission is normally required if the combined area of all outbuildings covers over half the garden.
- Permission is normally required for any building which is not for domestic use.
- Permission is normally required for any building which is over 3 metres high with a pent roof or 4 metres high with an apex roof.
- Permission is normally required for any building which is within 2 metres of a boundary and over 2.5m high (8'2").
- Permission may also be required for any garden building which is nearer to a public highway than the original dwelling i.e. in front of the building line. For planning purposes a public highway includes any road or footpath with a public right of way. A dwelling in a corner plot or with a rear access lane or beside a public footpath could have two or even three building lines.
Unless a garden building can be seen from a public highway the local authority normally discovers a breach when advised by a neighbour. In the event of a breach householders are first invited to submit an application retrospectively. When we last checked planning decisions were taking around 3 months to complete from the date of application and fees were over £200 for a garden building at a residential property, excluding the cost of Ordnance Survey maps which are normally required.
Some "permitted development" is allowed without permission at most private dwellings, up to a certain volume. Permission is required for any building which causes the combined volume of outbuildings and extensions to exceed the permitted volume. Permitted development rights may be restricted if you live in a Conservation Area, a Listed Building or a National Park and permission may be required for any garden building. Permitted development rights may also be reduced on new housing estates where developer's consent may also be required.
This brief summary applies in England only and it is not intended to be a comprehensive guide. Please contact us for further advice. You can also try to contact your local planning department although they are much less contactable nowadays. Please consult the planning department at your local district council for the latest fees and lead times. You can also research online at the official Planning Portal website.
PICTURE: Building regulations approval is required for any garden building even slightly larger than this double garage, which is 18'3"x18'1" external wall size with an internal floor size of 29.3 square metres.
BUILDING REGULATIONS
The majority of garden buildings are exempt from building regulations and do not require approval, subject to certain conditions. Approval is required for any building with an internal floor area of more than 30 square metres e.g. 6x5m or 20'x16'6", the size of a small double garage. In addition, garden buildings of more than 15 square metres internal floor area should not be sited within a metre of the boundary unless constructed substantially of non-combustible materials e.g. 3x5m or 10'x16'6", the size of a small single garage.
The building control department of the local authority are responsible for ensuring compliance with building regulations and giving consent for new building work. Initially, the building control department must approve plans and specifications for any project before work can start. After that, local authority building inspectors make site visits at critical stages during construction and work can only proceed with the inspector's approval. It is therefore not possible to predict the exact work required or the cost with certainty as it depends on site conditions and other factors. Unlike the planning department, who approve the external appearance, building control must see structural calculations and foundation details, which normally requires the services of a structural engineer. In addition, the local authority charge hefty fees for their service.
Any project which requires building consent must comply with the National House Building Council (NHBC) Standards. These stringent standards for new homes are prohibitively expensive compared to the cost of a garden building, especially with regard to foundations. It is invariably better to revise your plans for any garden building to avoid the need to comply with building regulations.

PICTURE: A pent roof shed with double sliding doors
CHECKING THE DELIVERY
- Before opening the main packs always check the labels and codes carefully to be sure that you have the correct product.
- We often pack multiple accessories and fixings together in one bag or box.
- We often pack multiple accessories and fixings together in a small recycled cardboard box - if so, please ignore the printing on the box.
- We often attach small packs to the longest boxes - sometimes these small packs are hidden within the packaging.
- We often place small packs inside the largest boxes, so these items may not be delivered in a separate package.
- Due to carrier size restrictions we often send accessories separately on a different parcel carrier, which may arrive at a different time. The smallest items may be posted.
- Each time we send a consignment to you we send a confirmation with details of the carrier.
- Always open cardboard boxes carefully at the edges and never cut through the cardboard faces with a knife.
- Never throw away any of the packaging and keep it in good condition until after the assembly has been completed.
- Even if you are paying somebody else for assembly you can check the components before they arrive by referring to the delivery note, the assembly instructions and the parts list. Please contact us with any queries.
ASSEMBLY
If you intend to assemble the product yourself, some useful assembly tips follow. If a friend or family member will install the product for you please email this document to them or print it and show it to them because it contains useful information.
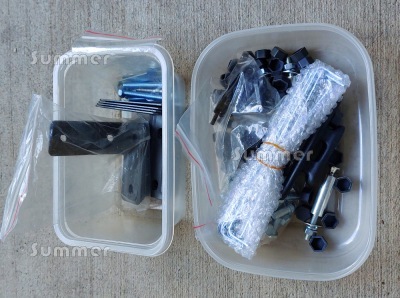
PICTURE: Before you start, put all of the fixings in containers for safe keeping.
GENERAL ASSEMBLY TIPS - BEFORE YOU START
- Check that your base is suitable. It should be flat and level, the correct size and solid enough to adequately support your product.
- Clear enough working space with sufficient clearance around the product to ensure that you can assemble it comfortably and remember to allow for future maintenance.
- Do not attempt assembly in windy weather.
- Wear gloves whenever required throughout the assembly.
- Beware at all times while handling components with sharp edges including fixings, glass or metal.
- Keep pets and children away during installation.
- Check that all components are present before starting the assembly.
- Careful measurement is often a useful way to identify individual components.
- Do not stain timber components until after assembly.
- Do not start the assembly unless you can complete it on the same day.
- It may not be possible to complete the assembly of some larger or more complex products within a single day, in which case you should stop the assembly at a sensible stage and ensure that the partly assembled product is fully protected until the work can be resumed.
- Do not leave partly assembled products exposed to bad weather or any other potential hazard.
- Read the instructions carefully all the way through before you start the assembly. Make sure you understand the work required before you start and if necessary read the instructions again.
- While reading the instructions refer to the parts list and the actual parts. You can work out what every part is before you start.
- It can save valuable time later if you know the next few steps and the order in which the assembly should be carried out.
- Before you start work you should carefully read this Product Information and any other information we supply, especially any specific assembly tips we may have listed.
- Do not always trust instructions in every detail. Occasional typographical and numerical errors can occur.

PICTURE: Cordless drills and screwdrivers are useful in the garden with no need for extension cables.
GENERAL ASSEMBLY TIPS - AFTER YOU START
- Keep all fixings and small components in one or more containers so it is more difficult to lose them.
- Assume that the components have all been delivered. Mistakes are rare. If you cannot find a component look again. Sometimes the missing component is smaller than you expect. Sometimes the missing component has been packed inside a larger component for protection. Sometimes the missing component has already been fixed to another component for your convenience, so it is not separate. Check the packaging thoroughly, many components are accidentally thrown away, especially smaller components.
- Assume that the components have been correctly made. Mistakes are rare. If the components do not fit together easily it is normally because you are holding one of the components inside out or upside down.
- Do not force the components into position.
- Do not cut or drill any components until you are completely confident. If you are not sure please contact us for advice.
- Be systematic and methodical. Try every possible way of assembling the components in turn until you find the correct combination. There are not many different combinations.
- Bolts should be finger tight and screws not fully tightened until the assembly is almost complete. If possible leave out some fixings until later. This provides flexibility throughout the installation, especially at the end.
If you lose the specific instructions for your building or if you leave the instructions out in the rain, please contact us. We normally have a digital version of the instructions available for most of our products which we can email to you on request.
INSTALLATION VIDEOS
We offer thousands of products and to date we only have assembly videos for a few of them, although we are working on it. We produce full assembly videos for some products but we also produce shorter videos with useful tips, which are based on the most frequent customer queries. If we have any useful videos available we will email links to you. Please check our emails. If you have received no links to videos in our emails then sadly we have no videos available at present. If so we recommend that you search on Google or You Tube for general online videos of similar products, which are a great way to familiarise yourself with the general process of installing your product. Two very similar products may not be identical but there are normally many similarities. On the other hand, although two products may look similar there may also be important differences. For this reason we recommend that you always watch several different videos of similar but slightly different products to ensure that you see a more useful overview. If you watch only one video it may be unusual and of little relevance to your specific product. We recommend that you search for videos of a similar design to your product as these are normally the most useful. We recommend using videos in addition to and not instead of the printed instructions.
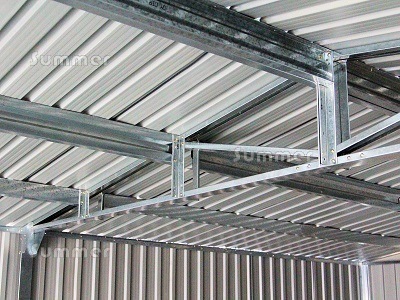
PICTURE: Roof trusses provide additional support for larger buildings
SPECIFIC TIPS
- How to Open the Boxes: Many of our metal sheds are delivered in heavy duty boxes with honeycomb cardboard and strong right angled cardboard edge protectors. To open these boxes quickly, easily and neatly just prise the staples out at the corners with a slotted screwdriver. The lid can then be easily removed in one piece. To open more conventional boxes easily use a knife to carefully cut through the clear adhesive tape holding the cardboard edges together.
- Corner Roof Sheets - Apex Roof Buildings: All apex roof metal buildings include 4 corner sheets in the roof, one for each corner. At first glance they look identical. In fact, each sheet is drilled in different places to suit only one of the four roof corners. Check the labels and the position of the pre-drilled holes carefully before fixing the sheets, to be certain that you have the correct sheet in each corner. If you fit a sheet in the wrong place the best option is simply to remove it and refit it in the correct place, with no significant consequences as a result.
- Corner Roof Sheets - Smaller Pent Roof Buildings: Smaller pent roof metal buildings include 2 corner sheets in the roof, one for each side. At first glance the sheets look identical but in fact they are handed. Check the labels and the position of the pre-drilled holes carefully before fixing the sheets, to be certain that you have the correct sheet in each corner. If you fit a sheet in the wrong place the best option is to remove it. You should fit all of the sheets in the correct place. If not you will end up drilling extra holes and leaving holes in your new shed roof.
- Corner Roof Sheets - Large Pent Roof Buildings: Larger pent roof metal buildings include 4 corner sheets, one for each corner. Although they look identical, each sheet is drilled in different places to suit only one of the four roof corners. Check the labels and the position of the pre-drilled holes carefully before fixing the sheets, to be certain that you have the correct sheet in each corner.
- Overlapping Roof Sheets - Large Pent Roof Buildings: The roof span of larger pent roof metal buildings is longer than the maximum length of the roof cladding panels, so these buildings feature 2 rows of overlapping roof cladding sheets. You must fit the lower row of roof sheets first and the higher row last, with the higher sheets overlapping onto the lower sheets. This ensures that rainwater drains away effectively. If not, rainwater drains into the building.
- Sliding Door Mechanisms: The sliding mechanisms at the top and bottom of sliding doors are smaller and simpler than some people expect. Occasionally a customer reports that they are missing but they are invariably found. They are small plastic components, which are packed in the fixings bag.
- Galvanised Steel Base Kits: The base kits feature steel floor joists with a small flange at each end. The flanges are used to fix the joists into the foundation rails, if required. It is not normally necessary to fix the joists in place, so the flanges are rarely used. The fixings protrude, which makes laying floor boards more difficult and the joists are held in place by the boards anyway. Fixing the joists can be useful to hold the joists in place while laying a floor screed. Being steel the joists are heavy but the flanges are comparatively delicate. It is not unusual for the flanges to be bent over in transit because they take all of the weight at both ends. If required, the flanges can be easily twisted back into shape within a few seconds as part of the assembly work, either by hand or using pliers.
- Hammer Fixings: The optional hammer fixings are placed in a bag which is smaller than a crisp packet. The bag is sometimes fixed to the end of a long box. The boxes are very well wrapped with plastic so the small bag is easy to miss and people often throw it out with the packaging. The hammer fixings may also be packed in the main box or packed together with other accessories or posted separately.
- Corner Brackets: The optional corner brackets are placed in a bag which is smaller than a crisp packet. The bag is sometimes fixed to the end of a long box. The box is very well wrapped so the bag is easy to miss and people often throw it out with the packaging! Please note that the corner brackets are sometimes packed in the main box or packed together with other accessories or posted separately.
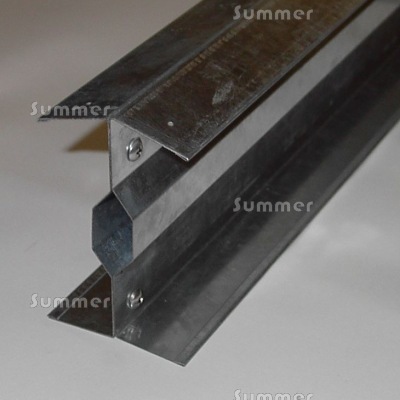
PICTURE: A roof purlin, made from two beams joined together
AFTER SALES AND SPARES
If you damage a component during installation please contact us for help. Our products are manufactured to a consistent standard and the components are rarely cut or drilled incorrectly. We recommend that you do not drill or cut the components. If you are considering it please try all other possible solutions first. Often the components will fit correctly if reversed. Check that other adjacent fixings are not too tight. Also, check that you are using the correct part. Often different parts look very similar. If you damage a component during installation please contact us for help. Although we are always happy to supply spares it may be at least a few days before we have time to find and pack the correct component, especially during busy periods.
As part of our after sales service we are always happy to help one of our customers if we can at any time even long after the original purchase. However the availability of spare parts is subject to availability and often limited. Please note that spares may not be a perfect match as some components may vary slightly from batch to batch. A reasonable charge is payable for any components supplied including shipping costs.
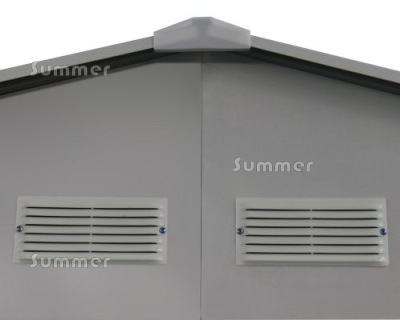
PICTURE: Two ventilator grilles, fitted in an apex gable
CONDENSATION
- Condensation occurs when water vapour in the air forms into drops of water on a cold surface. It may form on the internal surfaces of a building if the temperature inside is warmer than the temperature outside.
- Condensation occurs more frequently when the air is saturated with moisture, for example at the most humid times of year, especially during the spring and autumn or during milder winter weather. Fog, mist and dew are examples of saturated air.
- The best ways to reduce condensation are heat and ventilation. Garden buildings are often unheated and therefore prone to condensation.
- In a new building with a new concrete base, heavy condensation is commonplace. All of the water used to make the concrete needs to dry out. For example, a concrete base 10'x10' (3x3m) contains around 300 litres or 60 full buckets of water, which gradually evaporates over months as the concrete cures fully.
- In a new building sited in an area which was previously open to the elements, heavy condensation is commonplace. A lot of water in the ground is gradually released after it is enclosed by a new building.
- Condensation in new buildings is much worse during the first season as the ground and the base gradually dries out. It is rarely a problem after the first year.
- Condensation is often incorrectly assumed to be leaks.
- Steel cladding is more susceptible to condensation than timber because steel conducts heat more efficiently and it is impenetrable to water vapour. For this reason our metal buildings include ventilator grilles which are permanently open to provide continuous ventilation. In normal circumstances this ventilation helps to reduce condensation but it is less effective when the air is saturated.

PICTURE: A large apex roof shed with double sliding doors
PROTECTION FROM WIND
Your building should be placed in a sheltered position to protect it from winds. This is not always possible in a normal domestic garden but you should choose a site which affords as much protection as possible. It is important to keep the doors and windows firmly shut in windy weather and locked if possible to ensure that there are no openings for the wind to enter. If a strong wind is allowed to enter it even the strongest garden buildings are prone to damage. Addresses in hilly or rural areas or within a few miles of the coast may be prone to stronger winds and more protection is therefore required. If the site does not afford much natural protection consider screening exposed sides. The larger and taller your building is, the more vulnerable it is to wind. Your building should not be elevated above the surrounding ground. Even a slight elevation of only a few inches presents a higher profile with increased wind resistance.
PROTECTION FROM RAIN
A garden building is not as waterproof or draughtproof as a modern house and leaks or draughts are not uncommon. However, despite this it is a great place to store a multitude of household and garden items. If a large part of the roof appears to be leaking this is normally condensation. Leaks are more specific, with a visible gap or defect outside and a corresponding pool of water inside. We do not recommend additional seals, which should not be needed if the fixings are correctly installed. Before you buy any sealants or flashing, please check that the fixings have all been fastened correctly. Water can seep in through fixings which are misaligned or at an angle or not screwed fully home. However, if you want to improve the standard weatherproofing the careful use of silicone sealant may help to seal any gaps and stop leaks or draughts. If you have any special storage requirements other options to consider include coating external screws with silicone sealant before fixing, applying a bead of silicone sealant between the roof cladding sheets at the overlaps during assembly and using clear external flashing tape to cover all fixing heads and cladding overlaps. Be careful not to block any design drainage. Silicone sealant and flashing tapes are available from DIY stores for only a few pounds. The best silicone sealant to use is low modulus which is more elastic and better for sealing gaps.
Building your shed on an existing patio is often convenient, but there is a risk of rainwater seeping underneath the foundation rails and into the building. With any building placed on an oversize base there is a risk of saturation caused by rainwater splashback. Water seeps in at the corners and joints, around the door cills or under the doors. Pools of water may form inside after a downpour. It is difficult to permanently seal all of the gaps with sealant. Drainage channels such as French drains are an effective solution which can be retrospectively fitted. Otherwise occasional water ingress is likely without regular maintenance.
INTERNAL STORAGE
Garden buildings are designed to store items for outside use which can withstand damp conditions, including garden tools, garden furniture and many other garden and household items. Your building may not be suitable for storing delicate items which require a warm and dry environment such as indoor electrical appliances, indoor furnishings, electronics, fabrics, clothing, bedding, coal, cement, plaster, food, powder, paper, books or any other items which are sensitive to moisture. We recommend storing delicate items in sealed containers.

PICTURE: A pent roof metal bike store
INSURANCE
All garden products are exposed and vulnerable to many insurable risks including falling trees, arson, vandalism, burglary, attempted break-ins, wind damage and flooding. In many cases these risks are covered by household insurance policies. However, it is best to be sure. You should make a point of advising your insurer about any valuable new garden product. You should also advise your insurer about any high value items which are stored inside a garden building.
COMMERCIAL USE
Our products are designed primarily for domestic use and the majority of our customers are domestic consumers. Despite this, over the years our business customers have used many of our products for a wide variety of commercial uses. Many of our lower priced products are intended for less intense domestic use only and are not designed for heavy commercial use. However, many of our better products are more suitable for commercial uses, although this depends on the exact nature of that use. Please email us with details of your intended use and our experts will be happy to offer helpful advice.
MODIFICATIONS
We do not recommend modifying our products in any way or using them for any purpose other than the primary use for which they were designed.
EU CE MARKING AND UKCA MARKING
UKCA marking is set to replace European CE marking for construction products in the UK from 30th June 2025. Until then CE marking remains valid under UK law.
- CE marking is a legal requirement for many products sold within the European Economic Area. Correct CE marking indicates that a product conforms with the applicable requirements.
- The UK government hopes to replace CE marking with UKCA marking, although implementation has been delayed several times. UKCA stands for United Kingdom Conformity Assessed.
- The UK government hopes to replace CE marking for construction products as defined in The Construction Products Regulations 2013 with UKCA marking from 30th June 2025. Until then CE marking remains valid in the UK.
- Our construction products include kits and components which comply with international standards, including British standards and European standards, as certified by international certification bodies with EU Notified Body status and also, whenever possible, with UKAS approval although this is not currently mandatory. UKAS stands for United Kingdom Accreditation Service.
- CE marking is normally fixed to or printed on construction products when possible but the law recognizes that in many cases this is not practical. In such cases, the CE label can be fixed to the packaging or included within the order documentation instead.
- After considering how to securely apply a durable CE label during the manufacturing process we concluded that it is not practically possible for many of our products, in which case our CE labels are fixed to the packaging. If your product includes more than 1 box the CE mark may be fixed to one box only.
- We are happy to supply an adhesive plastic CE label for you to fix to the product if you wish, for example if you are a business selling our product to your customer. It can be fixed after assembly. We recommend fitting it on a flat surface somewhere on the inside of the building where it can be seen and read but is unlikely to be disturbed or damaged in normal use.
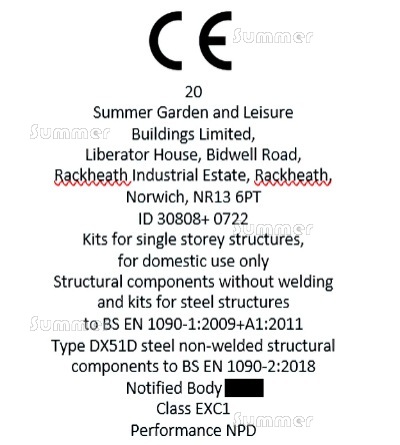
PICTURE: Your CE label will look similar to this.
THANK YOU FOR SHOPPING WITH SUMMER GARDEN BUILDINGS
We produced these guidance notes in order to assist our customers, with comprehensive and detailed advice about many different topics. However, despite our best efforts to update the details regularly, the product specifications and the instructions are subject to change and it is not possible to provide accurate information in every case. We apologise if your specific concern is not adequately covered. Please contact us if you have any queries.